


I have written before about volunteering with Code Club, and in the comments for that article, I discussed using p5.js to teach Javascript. p5.js, according to their website, is ‘a JavaScript library that starts with the original goal of Processing, to make coding accessible for artists, designers, educators, and beginners, and reinterprets this for today's web.’ It seems the perfect fit for young people to get to grips with modern Javascript.
There are two main functions to be aware of when using p5.js. The first is setup and the second is draw. The setup function occurs just the once and sets up a canvas upon which we can draw. The draw function occurs once during each frame - In this case, a frame is similar to the concept used during stop-motion animation in that each frame occurs a specified number of times a second - defaulting to 60 frames a second. Invoking frameRate(30) within the setup function halves the default and might make all the difference when working on older machines. Though, for purists, if 24 frames-per-second was good enough for Ray Harryhausen then I dare say it is good enough for you.
Once we have those two functions in place, we are left to our own devices. There are a few other things which p5.js gives us as, by default, it adds some variables and functions to the global namespace. I can hear OOP purists complaining about this already, and I agree to an extent. It should be noted that there is a way of setting it up in something called instance mode which should please the purists.
I guess now would be a good time to take p5.js for a spin. All you really need is to include it as a requirement in a plain HTML page; you don’t even need to include a canvas element. It’s always nice, though, to add some simple CSS so I generally add a minimal classless CSS framework such as sakura.
In this instance I’m going to walk you through the process I used to create Pacman for a future Javascript lesson I’m planning for Code Club. I’m going to create a canvas and a stub variable for my Pacman, set the frame rate to 24 and instantiate the Pacman. Then, during each draw, I’m going to clear the background, draw my Pacman and then update the internal variables of my Pacman:

That all seems simple enough doesn’t it? Even the function names are pretty self-explanatory: createCanvas creates a canvas and frameRate sets the frame rate. I’ve continued this by naming the Pacman methods in a similar way: draw draws the current state of the Pacman and update updates it ready for the next frame. It’s worth bearing in mind that each frame is layered one atop the other so the background call is within the draw to overwrite the existing canvas.
The Pacman es6 class should be pretty self-documenting, though I did need to do a bit of research to figure out how to draw the arc correctly. That’s more down to my maths being rusty though, not as a result of any peculiarity of p5.js.
This, then, is the Pacman class:
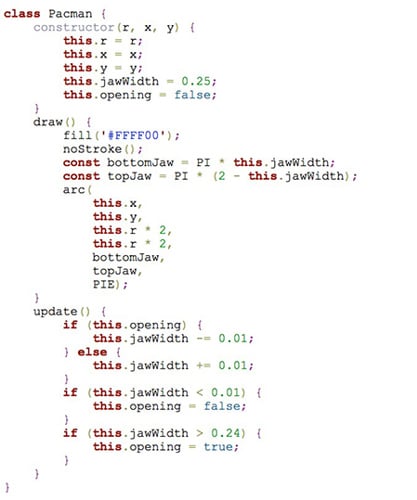
Here we can see a couple of the things given to us by p5.js such as PI and PIE. Some other p5.js system variables are unbelievably useful, such as the ability to get the width and height of the current canvas.
This link is to the JSFiddle where I’m currently working on Pacman, though a fair bit of development is also occurring in trinket.io as - on that playground - you can create multiple files, so the Pacman class resides in a file called pacman.js.
I hope that this gentle introduction to p5.js has piqued either your professional or personal interest; hopefully both. Please do share what you’ve done with it and, if you want to research it some more, can I point you to The Coding Train. There you will find all sorts of cool experiments, resources and challenges.